
Git Series: Working with Git (Part 2)

Self taught product designer and developer.
Intro
In the previous article, I covered all the foundations required to understand git and now it's time we start working with git.
Installing Git
In order to work with git, you will need to install it first on the system that you are working on. You can visit this link to download git and install it on your system.

Once git is installed you can start setting it up.
Setting up the username and email in git
Setting the user name and email in Git is important because it associates your commits with your identity.
When you make commits in a Git repository, Git records the author of each commit. This information includes the user name and email associated with the commit.
Also when you will push commits to a remote repository on platforms like GitHub or Bitbucket or Gitlab, Git will use the user name and email to link the commits to your user account.
Configuring the username:
git config --global user.name "Your name"
Configuring the email:
git config --global user.email "Your email"
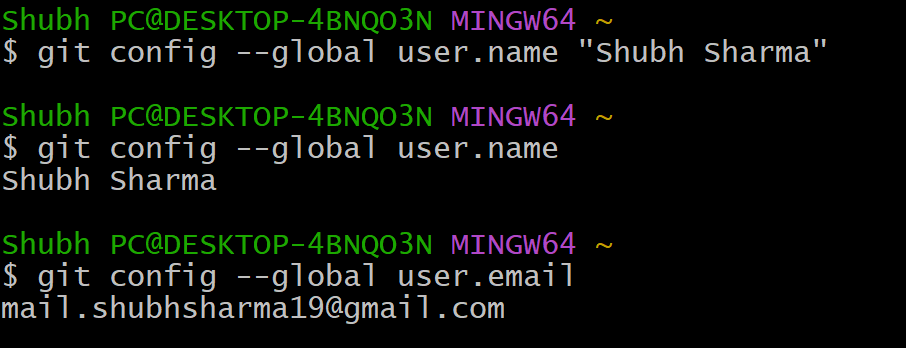
Checking username and email
You can check your username and email by the following commands:
git config --global user.namegit config --global user.email
Understanding Commits and Staging area
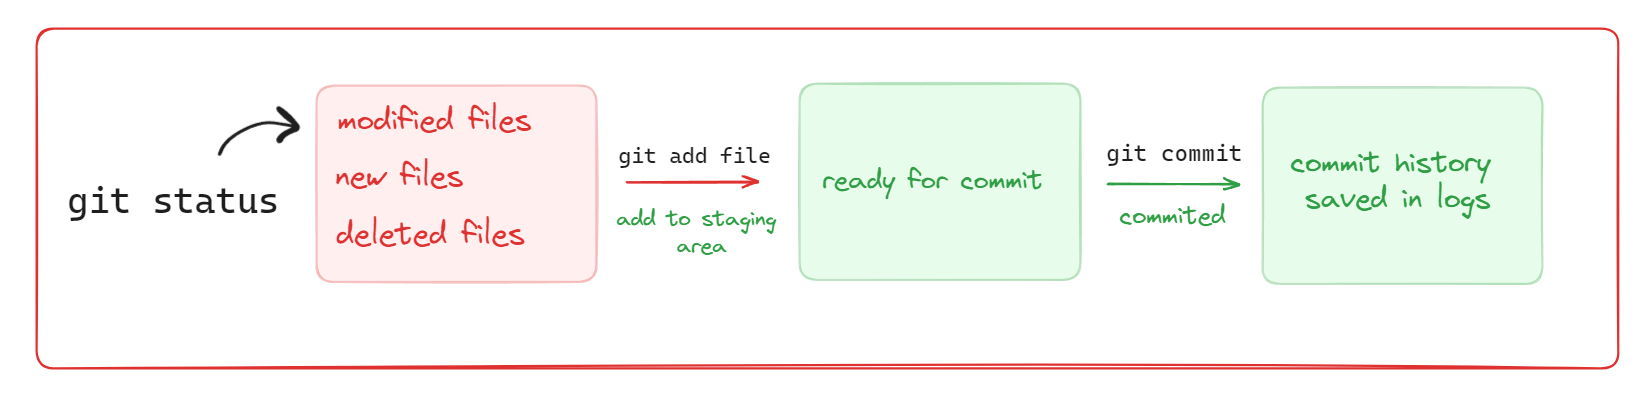
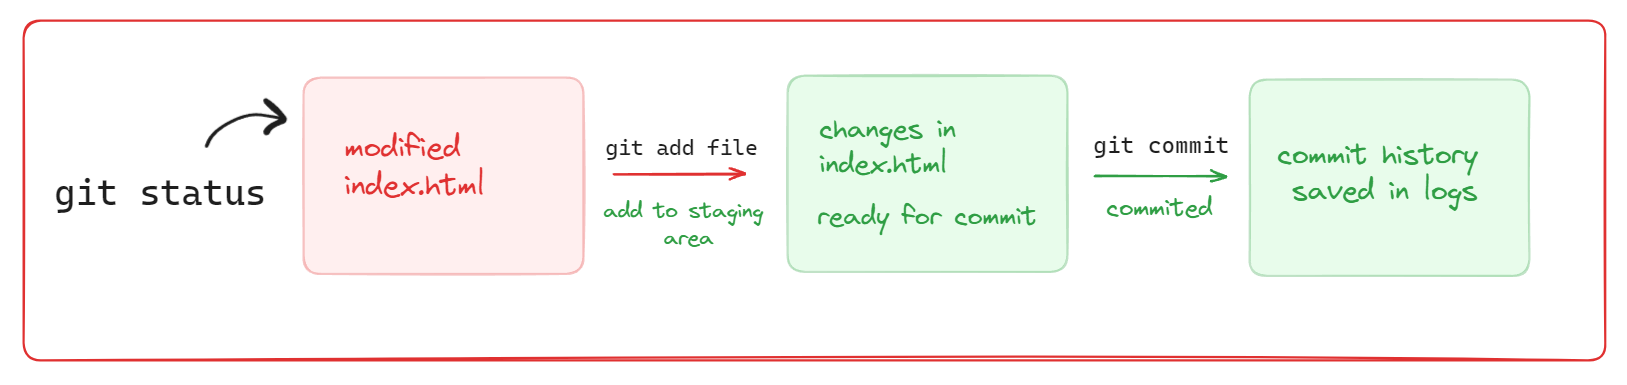
Imagine you have a project folder on your computer. Inside this folder, there's a single file called
index.htmlwhich contains some HTML code.You made some changes to this file. However, these changes aren't immediately saved as a commit. You will have to manually commit those changes.
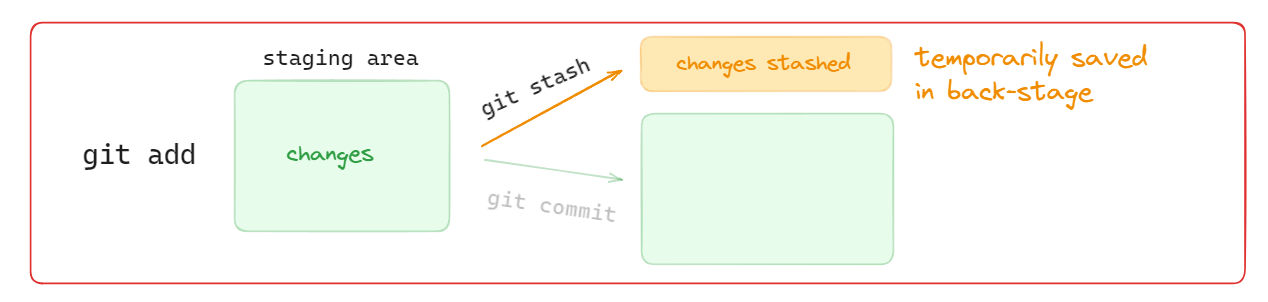
Before committing your changes, you first need to decide which changes should be included in the commit. This is where the Staging area comes in. It acts as a holding area for the changes you want to include in the next commit.
You start by adding the modified file to the staging area. This means you're telling Git, "Hey, I want to include these changes in the next commit."
Now you made some more changes to other files, such as adding a new folder called "images" with some image files. These changes are not yet staged.
To add these changes to the staging area you can use the git command.
git add filecommand is used to add the modified file to the staging area.Once you're satisfied with your changes and want to save them as a commit, you commit them using the command
git commit -m "commit message".Git takes all the changes that are currently staged in the staging area and creates a new commit.
Now, you can continue making more changes to your project, and this cycle of staging and committing will repeat whenever you want to save your progress.
Note: Remember that every commit has a hash code that is used to uniquely identify a commit. For example, bd182bb110141bc21cefc98ad is a hash value for a commit I made in my git.
So the main 3 commands that are frequently used in git to work with the changes are:
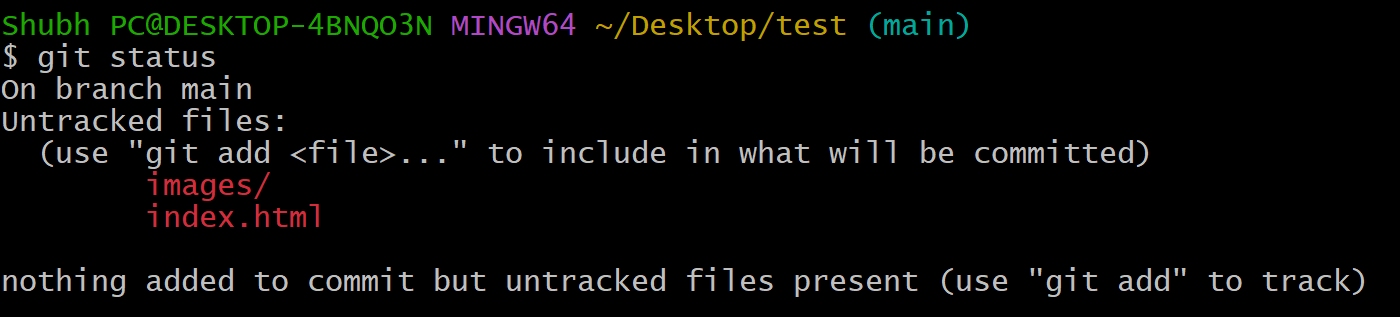
git status
git status is used to check the status of the files. This command shows all the modified, new or deleted files in the folder. Here you can see 👇
git add
git add command can be used in various ways but the most used ways are:
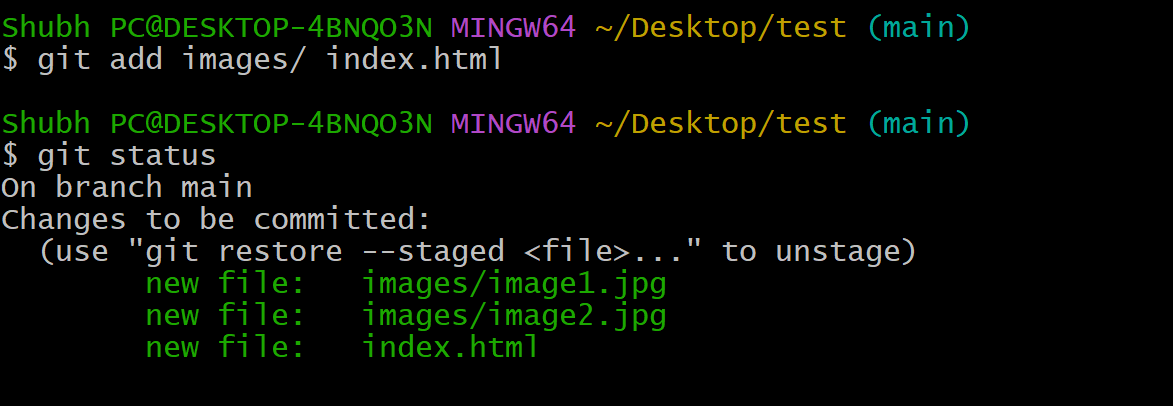
git add filewill add the file that you provided to the staging area.git add .will add all the changed files to the staging area.git add file1 file2 file3to add multiple files manually
Here you can see I added 2 files in the same command with the space between👇
git commit
git commit command can be used in various ways but the most used ways are:
git committakes you into Vim to provide a message, however, a lot of newbies might get stuck inside Vim so it's not a recommended way for new developers.git commit -m "message"is used to provide the message along with the command itself. Here-mmeans message mode.
Here you can see I committed the files and provided a commit message as well as "added new files" 👇
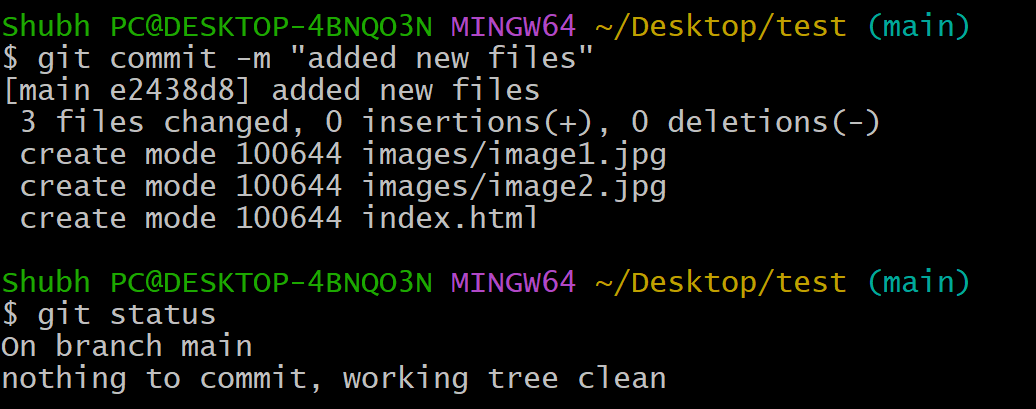
Note: Once all the files that were modified are committed and there is no new change in the branch, you will see "nothing to commit, working tree clean"
In short, first, check the status of the changes, then add these changes to the staging area and then commit those changes.
git log
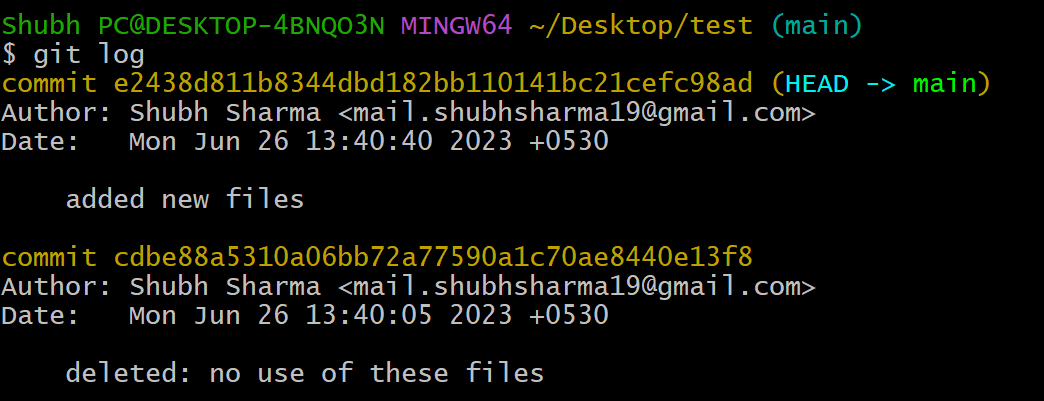
You can look at the history of the commits using the command git log This command shows everything about the commits such as the date and time of the commit, the commit message and the hash as well.
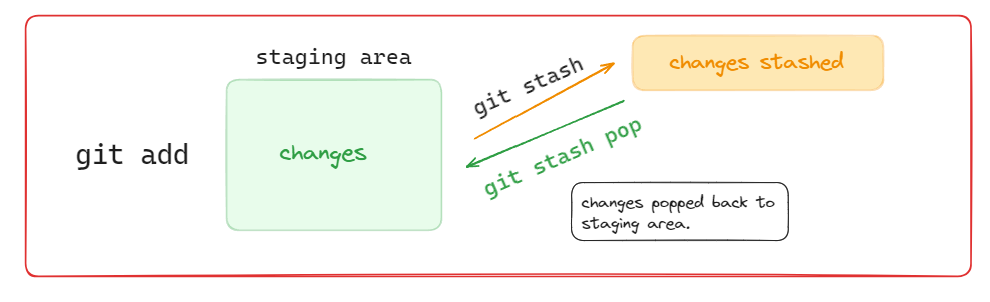
What is git stash?
The git stash command is used in Git to temporarily save changes that you have made in your working directory, but you don't want to commit yet. This is called stashing.
A lot of folks get confused about stashing however it's not a very complex topic to understand.
Think of the staging area as the "stage" where you put your changes when you want to commit them or stash them and think of stash as "backstage" where you put the changes that you do not want to commit yet.
This keeps things clean and uncluttered in case you do not want to commit something yet.
To stash the changes, first, add the changes to the staging area using the
git addcommandOnce changes are added to the stage now is time to put them backstage using the
git stashcommand.

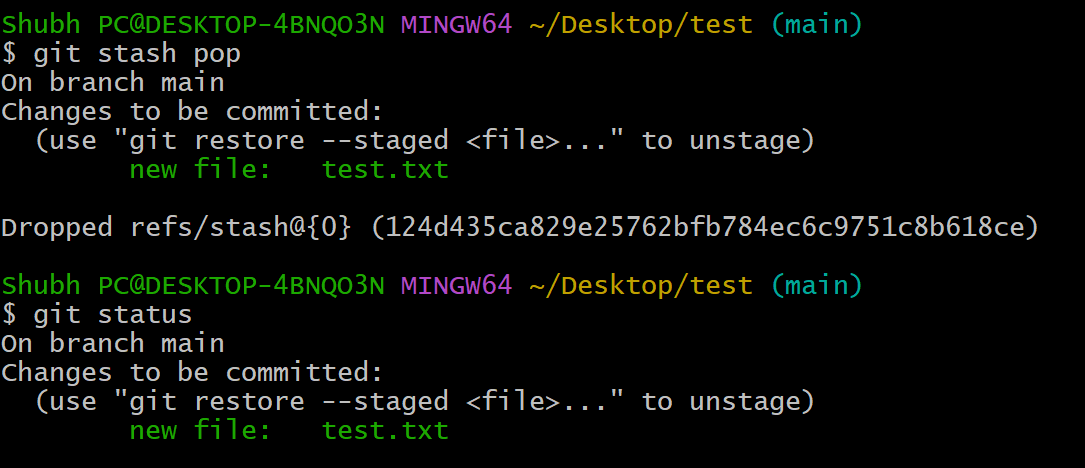
git stash pop
To bring back the changes from the "stash" area to the "stage" area you can use the command git stash pop
git stash clear
If you feel that you no longer need stashed changes anymore, then you can delete those changes using the command git stash clear
main branch and other branches
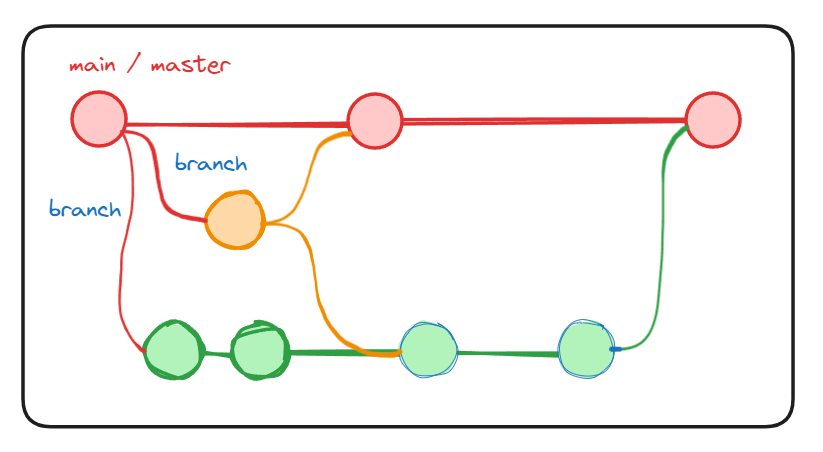
"Main" is the default branch in a repository. It's the branch from where other branches come from. You can think of the main branch as the root of the tree.
Every other branch comes from the main branch. This is done so that the changes done on other branches do not create any change in the main branch.
Note: when you will start using git, there is a chance you might see the master branch instead of the main branch. This is because the master branch is renamed to the main branch on GitHub. This was done in 2021 August and since then master is called the main branch.
Here you can see the main branch written in the brackets 👇

git branch
git branch command is used to see all the branches in the repo. Here you can see 👇

Note: that star thing is called a pointer that points to the main branch, which means all the commits we make will be done on the main branch right now.
But what if I want to make changes or a new feature without making any impact on the main branch? The answer is "by creating new branches".
git branch branch-name
To create a new branch use this command: git branch branch-name
For example, I created a branch called test-feature, you can give it any name you want, however making a new branch won't means that now your commits will be added to this new branch.
In order to make your commits on this new branch you will need to put the pointer on this new branch. To do that we will use git checkout command.
git checkout branch-name
To put the pointer on the newly created branch use this command:
git checkout branch-name
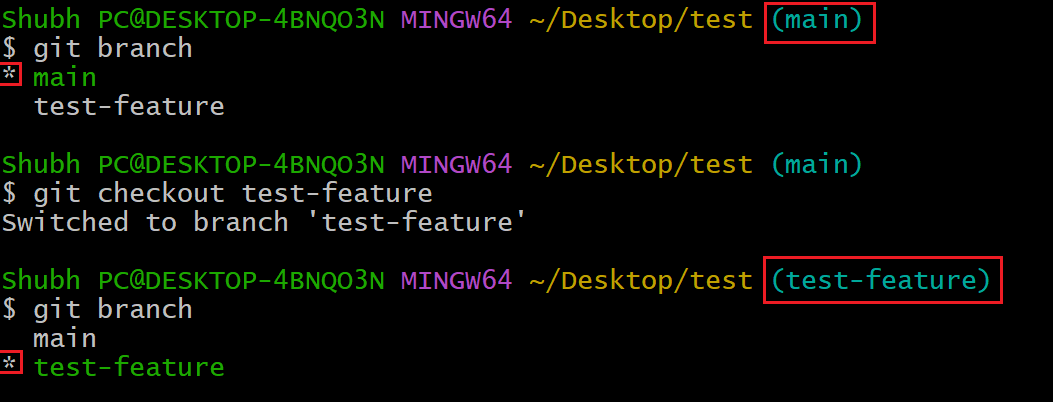
You can see that now the (main) is changed to (test-feature), which means the pointer is pointing to the test-feature branch.
Now you can create commits on this test-feature branch and it won't affect anything on the main branch.
Conclusion
So far we covered the following:
staging area
commits
commit history
status
stashing and popping from the stash
main/master
branches and creating commits on the branches

In the next article, we will go deep into advanced concepts such as remote, clone, forking and cloning the fork, unstaging, revert, rebase, etc.


